Guide · Copy mode
tmux scroll and copy mode: scroll up, search, copy and paste
tmux keeps each pane's output in its own scrollback, so your terminal's scroll bar does not see it. To scroll up, press Ctrl+b [ to enter copy mode, move with the arrow keys or PgUp, and press q to leave. In tmux 3.8 you can also just turn the mouse wheel.
On this page
- How to scroll up and down in tmux
- vi or emacs keys
- How to search the scrollback
- How to select and copy text
- How to paste
- Paste buffers: list, choose, save and delete
- Copy to the system clipboard (local and over SSH)
- Copy and paste with the mouse
- Line numbers in copy mode (tmux 3.7)
- Watch new output in copy mode (tmux 3.8)
- Every copy mode key: vi and emacs side by side
- Scrollback size: history-limit and clearing history
- Save the scrollback to a file
- When scrolling or copying does not work
- Frequently asked questions
Quick answer
How do I scroll up in tmux?
- Press Ctrl+b [ (Ctrl+b, then [), or Ctrl+b PgUp to enter and go up a page at once.
- Scroll with ↑ ↓, PgUp PgDn, or the mouse wheel.
- Press q to go back to the bottom and leave copy mode.
The mouse wheel scrolls without any setup on tmux 3.8, where mouse is on by default. On older versions add set -g mouse on to ~/.tmux.conf.
How to scroll up and down in tmux
Copy mode freezes the pane's view so you can move around its history: the program keeps running and its new output is kept, but the screen stops following it until you leave. An indicator in the top right shows where you are, for example [39/61]: 39 lines up from the bottom of 61 lines of history.
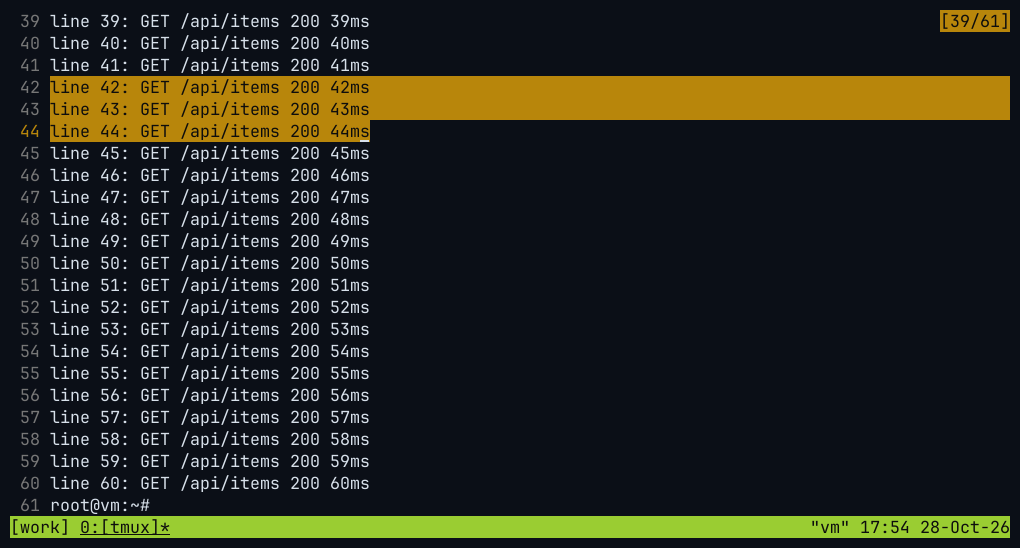
How this was captured
Captured 2026-10-28 17:54 UTC from a real xterm window running tmux 3.8 on Ubuntu 24.04. Nothing is mocked up. The commands that set up the screen:
tmux new-session -d -s work -x 100 -y 23
tmux send-keys -t work 'clear; for i in $(seq 1 60); do echo "line $i: GET /api/items 200 ${i}ms"; done' Enter
tmux copy-mode -t work
tmux send-keys -t work -X search-backward 'line 42'
tmux send-keys -t work -X begin-selection
tmux send-keys -t work -X -N 2 cursor-down
tmux send-keys -t work -X end-of-line| To | vi keys | emacs keys (default) | Either |
|---|---|---|---|
| Enter copy mode | Ctrl+b [, or Ctrl+b PgUp to also go up one page | Mouse wheel up | |
| Line up / down | k j | ↑ ↓ | ↑ ↓ |
| Half page up / down | Ctrl+u Ctrl+d | Alt+↑ Alt+↓ | |
| Page up / down | Ctrl+b Ctrl+f | Alt+v Ctrl+v | PgUp PgDn |
| Top / bottom of history | g G | Alt+< Alt+> | |
| Leave copy mode | q | q or Esc | Ctrl+c |
The wheel scrolls 5 lines per notch, and scrolling back down to the bottom leaves copy mode by itself. In full-screen programs such as Vim, less or htop, the wheel goes to the program instead (since tmux 3.6), because they use the terminal's alternate screen and have no tmux history to scroll.
Want PgUp without the prefix? These lines make the bare keys enter copy mode and scroll, and leave it again at the bottom:
bind -n S-PPage copy-mode -eu
bind -n S-NPage copy-mode -ed
That binds Shift+PgUp / PgDn; many terminals use those keys themselves, so check yours passes them through.
vi or emacs keys
Quick answer
How do I use vi keys in tmux copy mode?
Add setw -g mode-keys vi to ~/.tmux.conf and reload it. Check which set you have with tmux show -gw mode-keys.
The default is emacs keys, unless your VISUAL or EDITOR environment variable contains "vi" when the tmux server starts. With EDITOR=nvim or EDITOR=vim you already get vi keys, which is why two people's copy mode can behave differently with the same config. The setting picks between two key tables, copy-mode-vi and copy-mode; the full side-by-side list is below.
setw -g mode-keys viHow to search the scrollback
Quick answer
How do I search in tmux?
Enter copy mode with Ctrl+b [, then with vi keys press ? to search up or / to search down; with emacs keys press Ctrl+r (up) or Ctrl+s (down). Type the text, press Enter, then n and N for the next and previous match.
| Search | vi | emacs |
|---|---|---|
| Search up (into history) | ? | Ctrl+r (incremental) |
| Search down | / | Ctrl+s (incremental) |
| Next / previous match | n N | n N |
| Word under the cursor | * (down) # (up) | not bound |
| Jump to a character on the line | f F t T, then ; , | f F, then ; , |
| Go to a line number | : | g |
Three things we checked on tmux 3.8 that are worth knowing:
- Case: a search in all lowercase ignores case (
errorfindsERROR); any capital letter makes it exact (Errordoes not). - Regular expressions: the vi / and ? searches are regular expressions, so
E.*onematchesERROR one. Escape.,*and[to match them literally. - Match count: the indicator shows how many matches were found, for example
(3 results).
If your shell marks its prompts with the OSC 133 escape sequence (many shell-integration scripts do), the emacs keys Ctrl+Alt+↑ and Ctrl+Alt+↓ jump from one command's prompt to the next; without those marks they do nothing.
How to select and copy text
Quick answer
How do I copy text in tmux?
Enter copy mode (Ctrl+b [), move to the start, then:
- vi keys: press Space, move to the end, press Enter.
- emacs keys: press Ctrl+Space, move to the end, press Alt+w.
The text goes into a tmux paste buffer, and to your system clipboard too if your terminal supports it (see below). Paste it with Ctrl+b ]. With the mouse: drag over the text and let go.
| Action | vi | emacs |
|---|---|---|
| Start selection | Space | Ctrl+Space |
| Select the whole line | V | not bound |
| Rectangle (block) selection | v or Ctrl+v | R |
| Jump to the other end | o | not bound |
| Copy and leave copy mode | Enter | Alt+w or Ctrl+w |
| Copy to the end of the line | D | Ctrl+k |
| Append to the last buffer | A | not bound |
| Clear the selection | Esc | Ctrl+g |
setw -g mode-keys vi
bind -T copy-mode-vi v send -X begin-selection
bind -T copy-mode-vi C-v send -X rectangle-toggle
bind -T copy-mode-vi y send -X copy-pipe-and-cancel
copy-pipe-and-cancel with no command is what the default Enter runs: it copies to a buffer, sends the text to the clipboard where possible, pipes it to copy-command if you set one, and leaves copy mode. Use copy-pipe to stay in copy mode, or copy-pipe-no-clear to also keep the selection. Every copy command takes -P (do not create a paste buffer) and -C (do not send to the clipboard).
Rectangle selection copies a column of text, for example one field from a table of output. In tmux 3.8 the rectangle can also extend past the end of short lines, like Vim's virtualedit=block.
How to paste
Quick answer
How do I paste in tmux?
Press Ctrl+b ] to paste the most recent tmux buffer into the current pane. To paste text from your system clipboard (copied in a browser, say), use your terminal's own paste: Cmd+V on macOS, Ctrl+Shift+V in most Linux terminals.
Ctrl+b ] runs paste-buffer -p. The -p wraps the text in bracketed-paste codes when the program asks for them, so shells and editors know it is a paste: multi-line text is not run line by line, and Vim does not auto-indent it. With the mouse on, a middle click pastes too. tmux has no undo for a paste; in bash and zsh, Ctrl+u clears the line you have not yet run.
Paste buffers: list, choose, save and delete
Every copy creates a new buffer (buffer0, buffer1 …), and tmux keeps the last 50 (buffer-limit). Buffers belong to the server, so you can copy in one session and paste in another.
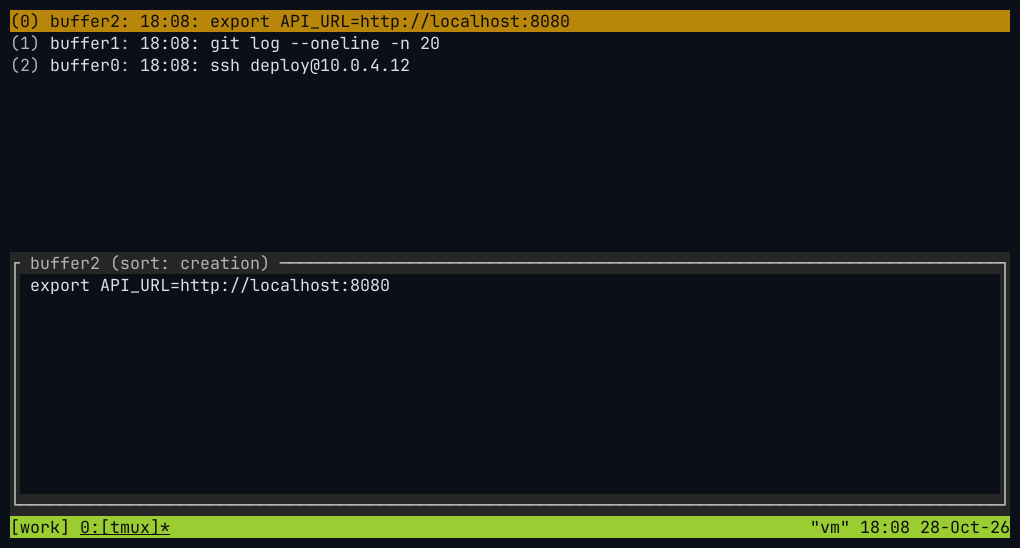
How this was captured
Captured 2026-10-28 18:08 UTC from a real xterm window running tmux 3.8 on Ubuntu 24.04. Nothing is mocked up. The commands that set up the screen:
tmux new-session -d -s work -x 100 -y 23
tmux set-buffer 'ssh deploy@10.0.4.12'
tmux set-buffer 'git log --oneline -n 20'
tmux set-buffer 'export API_URL=http://localhost:8080'
tmux send-keys -t work 'clear; tmux list-buffers' Enter
(typed in the terminal) C-b =| Keys / command | Does |
|---|---|
| Ctrl+b = | Choose a buffer from a list with previews: Enter pastes, d deletes, e opens it in your editor, t tags, P pastes all tagged |
| Ctrl+b # | List buffers (list-buffers) |
| Ctrl+b - | Delete the most recent buffer |
tmux show-buffer | Print the most recent buffer (-b name for another) |
tmux save-buffer ~/out.txt | Write a buffer to a file (-a appends, - is stdout) |
tmux load-buffer file | Read a file into a new buffer (- reads stdin, -w also sends it to the clipboard) |
tmux set-buffer 'text' | Create a buffer from text |
tmux paste-buffer -b buffer3 | Paste a named buffer (-d deletes it afterwards) |
tmux delete-buffer -b buffer3 | Delete a buffer |
echo "deploy@10.0.4.12" | tmux load-buffer -
tmux list-buffers
buffer0: 17 bytes: "deploy@10.0.4.12\n"
tmux save-buffer - | wc -c
17Copy to the system clipboard (local and over SSH)
Quick answer
How do I copy from tmux to the system clipboard?
Often it already works: tmux 3.8 sends every copy to your terminal with the OSC 52 escape sequence (set-clipboard external, the default), and terminals that accept it put the text on the system clipboard, even over SSH. If yours does not, tell tmux to pipe copies to your clipboard tool, for example set -s copy-command 'pbcopy' on macOS.
Option 1: OSC 52 through your terminal (works over SSH)
With set-clipboard at its default of external, tmux writes the copied text to the terminal as an OSC 52 escape sequence whenever the terminal description has the Ms capability. tmux adds it for any TERM starting with xterm (the default terminal-features), and since 3.6 it also detects OSC 52 support from the terminal's reply to a device attributes query. Because the escape sequence travels with the rest of the output, it works through SSH, mosh and nested tmux without any tool on the server.
What your terminal needs:
- Accept OSC 52 writes. kitty, WezTerm, Alacritty, foot, Ghostty and Windows Terminal do by default. iTerm2 needs Applications in terminal may access clipboard turned on in its settings. xterm needs the
disallowedWindowOpsresource changed (seeman tmuxunderset-clipboard). - A TERM tmux recognizes, or a line telling tmux. If your outer
TERMdoes not start withxtermand copies do not arrive, add the feature for it:
# replace "alacritty" with the value of $TERM outside tmux
set -as terminal-features ',alacritty:clipboard'
# let programs inside tmux (Neovim, a nested tmux) set the clipboard too
set -s set-clipboard on
set-clipboard on also accepts OSC 52 from programs running inside tmux and turns it into a tmux buffer plus a clipboard write. You need it when Neovim's OSC 52 clipboard, or an inner tmux, should reach your local clipboard. off disables clipboard handling completely.
Option 2: pipe copies to a clipboard program
Set copy-command (tmux 3.2 and later) and every default copy key, including the mouse, pipes the text to it. This works only for the clipboard of the machine tmux runs on, so it is the right choice locally and the wrong one over SSH.
set -s copy-command 'pbcopy'pbcopy ships with macOS. If copies do not reach the clipboard through OSC 52 in your terminal, this line is the simple fix; it also works alongside OSC 52.
# Wayland (GNOME, KDE Plasma, Sway…): needs the wl-clipboard package
set -s copy-command 'wl-copy'
# X11: needs xclip (or use 'xsel -ib')
set -s copy-command 'xclip -selection clipboard -in'
Use one line, not both. Check which you run with echo $XDG_SESSION_TYPE. tmux passes WAYLAND_DISPLAY and DISPLAY into new panes (update-environment), so after switching desktops a fresh pane may be needed.
set -s copy-command 'clip.exe'Inside WSL, clip.exe writes to the Windows clipboard. Windows Terminal also accepts OSC 52, so copies often reach the clipboard without this line. See tmux on Windows for the WSL setup.
For a key that copies to the clipboard program without changing the defaults, give the command to copy-pipe-and-cancel directly, for example bind -T copy-mode-vi y send -X copy-pipe-and-cancel 'pbcopy'. The tmux-yank plugin wraps the same idea and picks the right tool per system; see plugins.
The other direction, from the system clipboard into a tmux buffer, is tmux refresh-client -l: it asks the terminal for its clipboard with OSC 52, which only terminals that allow clipboard reads answer.
Copy and paste with the mouse
With the mouse on (default in 3.8), tmux handles mouse selection itself, so selections stay inside one pane instead of running across splits.
| Mouse | Does |
|---|---|
| Drag | Select; letting go copies the text and leaves copy mode |
| Double-click | Copy the word |
| Triple-click | Copy the line |
| Middle-click | Paste the most recent buffer |
| Right-click | Menu: copy word or line, search for the word, paste, line numbers, refresh |
| Shift + drag | Bypass tmux and use the terminal's own selection (Option + drag in iTerm2) |
The terminal's own selection (with Shift) copies whatever is on screen, borders and neighboring panes included, but it uses the terminal's clipboard directly, so it works even when OSC 52 does not. To keep the selection when you let go, so you can adjust it and copy with a key:
bind -T copy-mode-vi MouseDragEnd1Pane send -X copy-pipe-no-clear
bind -T copy-mode MouseDragEnd1Pane send -X copy-pipe-no-clear
To turn tmux mouse handling off and get your terminal's selection back everywhere: set -g mouse off.
Line numbers in copy mode (tmux 3.7)
tmux 3.7 can number the lines in copy mode, which helps with goto-line (: in vi, g in emacs) and with telling someone "look at line 42".
# off | default | absolute | relative | hybrid
setw -g copy-mode-line-numbers relative
absolute counts from the first line of history, relative from the cursor (like Vim's relativenumber), and hybrid shows the current line absolute and the rest relative. With emacs keys, L toggles numbers; with vi keys bind one, for example bind -T copy-mode-vi L send -X line-numbers-toggle. Numbers stay off when you enter copy mode with the mouse wheel.
Watch new output in copy mode (tmux 3.8)
Normally the copy mode view is frozen. In tmux 3.8, r refreshes it once from the pane, and the new refresh-on, refresh-off and refresh-toggle commands keep it updating as output arrives. It is off by default; when on, it scrolls only while the cursor is at the bottom and pauses while you are selecting.
bind -T copy-mode-vi R send -X refresh-toggleThe right-click menu in copy mode has Refresh On / Refresh Off too. These replace the older refresh-from-pane command.
Every copy mode key: vi and emacs side by side
The full default key tables of tmux 3.8, generated from tmux list-keys. Type in the filter to find a key or an action. For the prefix keys that enter and leave copy mode, see the cheat sheet.
| Action | vi (copy-mode-vi) | emacs (copy-mode) | Command (send -X) |
|---|---|---|---|
| Scroll | |||
| Cursor up | k ↑ | ↑ Ctrl+p | cursor-up |
| Cursor down | j ↓ | ↓ Ctrl+n | cursor-down |
| Cursor left | h Backspace ← Ctrl+h | ← Ctrl+b | cursor-left |
| Cursor right | l → | → Ctrl+f | cursor-right |
| Scroll up one line | K Ctrl+y Ctrl+↑ | Ctrl+↑ | scroll-up |
| Scroll down one line | J Ctrl+e Ctrl+↓ | Ctrl+↓ | scroll-down |
| Half page up | Ctrl+u | Alt+↑ | halfpage-up |
| Half page down | Ctrl+d | Alt+↓ | halfpage-down |
| Page up | PgUp Ctrl+b | PgUp Alt+v | page-up |
| Page down | PgDn Ctrl+f | Space PgDn Ctrl+v | page-down |
| Jump to the top of the history | g | Alt+< | history-top |
| Jump to the bottom | G | Alt+> | history-bottom |
| Cursor to the top line of the screen | H | Alt+R | top-line |
| Cursor to the middle line | M | Alt+r | middle-line |
| Cursor to the bottom line | L | not bound | bottom-line |
| Scroll so the cursor line is in the middle | z | not bound | scroll-middle |
| Cycle cursor line between centre, top and bottom | not bound | Ctrl+l | recentre-top-bottom |
| Cursor to the horizontal centre | not bound | Alt+l | cursor-centre-horizontal |
| Move | |||
| Start of line | 0 Home | Home Ctrl+a | start-of-line |
| End of line | $ End | End Ctrl+e | end-of-line |
| First non-blank character | ^ | Alt+m | back-to-indentation |
| Next word | w | not bound | next-word |
| End of next word | e | Alt+f | next-word-end |
| Previous word | b | Alt+b | previous-word |
| Next WORD (space separated) | W | not bound | next-space |
| End of next WORD | E | not bound | next-space-end |
| Previous WORD | B | not bound | previous-space |
| Next paragraph | } | Alt+} | next-paragraph |
| Previous paragraph | { | Alt+{ | previous-paragraph |
| Matching bracket (forward) | % | Ctrl+Alt+f | next-matching-bracket |
| Matching bracket (backward) | not bound | Ctrl+Alt+b | previous-matching-bracket |
| Next shell prompt (needs OSC 133) | not bound | Ctrl+Alt+↓ | next-prompt |
| Previous shell prompt (needs OSC 133) | not bound | Ctrl+Alt+↑ | previous-prompt |
| Go to line number | : | g | goto-line |
| Jump forward to a character | f | f | jump-forward |
| Jump backward to a character | F | F | jump-backward |
| Jump forward to just before a character | t | t | jump-to-forward |
| Jump backward to just after a character | T | T | jump-to-backward |
| Repeat the last jump | ; | ; | jump-again |
| Repeat the last jump, reversed | , | , | jump-reverse |
| Set a mark on this line | X | X | set-mark |
| Jump to the mark | Alt+x | Alt+x | jump-to-mark |
| Search | |||
| Search down (regex) | / | not bound | search-forward |
| Search up (regex) | ? | not bound | search-backward |
| Incremental search down | not bound | Ctrl+s | search-forward-incremental |
| Incremental search up | not bound | Ctrl+r | search-backward-incremental |
| Next match | n | n | search-again |
| Previous match | N | N | search-reverse |
| Search down for the word under the cursor | * | not bound | search-forward |
| Search up for the word under the cursor | # | not bound | search-backward |
| Select & copy | |||
| Start selecting | Space | Ctrl+Space | begin-selection |
| Select the whole line | V | not bound | select-line |
| Toggle rectangle (block) selection | v Ctrl+v | R | rectangle-toggle |
| Move to the other end of the selection | o | not bound | other-end |
| Clear the selection | Esc Ctrl+[ | Ctrl+g | clear-selection |
| Copy the selection and exit | Enter Ctrl+j | Alt+w Ctrl+w | copy-pipe-and-cancel |
| Append the selection to the last buffer and exit | A | not bound | append-selection-and-cancel |
| Copy to the end of the line and exit | D | Ctrl+k | copy-pipe-end-of-line-and-cancel |
| Mode | |||
| Exit copy mode | q Ctrl+c | Esc q Ctrl+[ Ctrl+c | cancel |
| Refresh from the pane once (3.8) | r | r | refresh-now |
| Toggle line numbers (3.7) | not bound | L | line-numbers-toggle |
| Toggle the position indicator | P | P | toggle-position |
| Repeat count for the next command | 1 … 9 | Alt+1 … Alt+9 | send-keys -N |
Generated from the default copy-mode-vi (88 bindings) and copy-mode (78 bindings) key tables of tmux 3.8, with no config file. Mouse bindings are listed separately in the mouse section. See them yourself with tmux list-keys -T copy-mode-vi.
Any key can be rebound with bind -T copy-mode-vi key send -X command (or -T copy-mode for emacs). The commands are the names in the last column; man tmux lists all of them under "WINDOWS AND PANES".
Scrollback size: history-limit and clearing history
Quick answer
How do I increase the tmux scrollback buffer?
Add set -g history-limit 50000 to ~/.tmux.conf. The default is 2,000 lines per pane. Check a pane with tmux display -p '#{history_size}/#{history_limit}'.
set -g history-limit 50000On tmux 3.7 and later, changing history-limit also applies to panes that are already open. On 3.4 and other older versions it only affects panes created afterwards, so put it in your config before tmux starts (or restart the server). The history is kept in memory for every pane, so very large limits across many panes add up; 10,000 to 100,000 lines is a common range.
To wipe a pane's history, run tmux clear-history (-t for another pane). clear or Ctrl+l in the shell only clears the screen; the lines are still in tmux's history. To do both:
clear && tmux clear-historySave the scrollback to a file
Quick answer
How do I save the whole tmux scrollback to a file?
Run tmux capture-pane -p -S - > scrollback.txt. -S - starts at the oldest line in the history and -p prints to standard output instead of a paste buffer.
# whole history plus the visible screen
tmux capture-pane -p -S - > scrollback.txt
# only the last 100 lines
tmux capture-pane -p -S -100 > last100.txt
# join lines that were wrapped by the pane width
tmux capture-pane -p -J -S - > joined.txt
# keep colors (ANSI escape sequences); view with less -R
tmux capture-pane -p -e -S - > colored.txt
# another pane: session work, window 1, pane 0
tmux capture-pane -p -S - -t work:1.0 > other.txt
# line numbers (3.7) and the time each line entered the history (3.8)
tmux capture-pane -p -L -S -3
tmux capture-pane -p -I -S -3Line numbers count back from the visible screen (-2, -1, 0), and -I prints a Unix timestamp before each history line (0 for lines still on screen). To record everything a pane prints from now on, rather than what is already there, use pipe-pane:
tmux pipe-pane -o 'cat >> ~/tmux-#{session_name}.log'
# run the same command again (or with no command) to stop
tmux pipe-paneCapturing from scripts, polling output and the other flags are covered in tmux scripting.
When scrolling or copying does not work
| Problem | Likely cause and fix |
|---|---|
| Mouse wheel scrolls the shell history or does nothing | Mouse is off (tmux before 3.8): add set -g mouse on. In Vim or less, the wheel goes to the program by design. |
| Terminal scroll bar shows garbage or nothing useful | tmux draws the screen itself, so the terminal's scrollback cannot see pane history. Use copy mode. |
| Copied text never reaches the clipboard | The terminal ignores OSC 52 or TERM lacks the feature: see option 1, or set copy-command. |
| Clipboard works locally, not over SSH | pbcopy/xclip run on the server. Use OSC 52 instead. |
| vi keys do not work, or work unexpectedly | Check tmux show -gw mode-keys; EDITOR containing "vi" switches the default. |
| Copy mode stuck, keys do nothing | Press q or Ctrl+c. If the pane is frozen, see troubleshooting. |
More fixes for clipboard, mouse and frozen panes are in tmux troubleshooting.
Frequently asked questions
How do I scroll up in tmux?
Press Ctrl+b then [ to enter copy mode, scroll with the arrow keys or PgUp, and press q to exit. With tmux 3.8, or with set -g mouse on, the mouse wheel works too.
How do I exit copy mode?
Press q. With emacs keys, Esc also works; with vi keys, Esc only clears the selection. Ctrl+c exits in both. Scrolling back to the bottom with the mouse wheel exits automatically.
How do I copy and paste in tmux?
Enter copy mode with Ctrl+b [, start a selection (Space in vi mode, Ctrl+Space in emacs mode), move to the end and press Enter (vi) or Alt+w (emacs). Paste with Ctrl+b ].
How do I copy from tmux to the system clipboard?
If your terminal supports OSC 52 it happens automatically. Otherwise set a clipboard command: set -s copy-command 'pbcopy' on macOS, 'wl-copy' on Wayland, 'xclip -selection clipboard -in' on X11 or 'clip.exe' in WSL.
How do I increase the scrollback history?
Add set -g history-limit 50000 to ~/.tmux.conf. The default is 2,000 lines per pane. Before tmux 3.7 the new limit only applies to new panes.
How do I search the tmux scrollback?
In copy mode, press ? (vi) or Ctrl+r (emacs) to search up, type the text and press Enter; n and N go to the next and previous match.
How do I select text with the mouse without tmux taking over?
Hold Shift while you drag (in iTerm2, hold Option). The terminal then selects text itself, as if tmux mouse support were off.
How do I save tmux output to a file?
Run tmux capture-pane -p -S - > file.txt for the whole history, or tmux pipe-pane -o 'cat >> file.log' to log everything from now on.
Keep learning
Something wrong or out of date on this page? Email hello@tmux.app and we will fix it.